# Import contacts
To import contacts into your Marketing section you have to prepare a .CSV document. To prepare a .CSV document one must open spreadsheet document (Example: Excel), where you type in all your contacts and their details. Each information about the contact must be written in its own column. Certain personalized information about your contacts will have to be added to your marketing section as new attributes and those have to be prepared in advance.
To prepare customer’s attributes, please read Attributes in the Marketing section or see the tutorial.

Important
Each contact in your .csv file should contain at least one unique identifier. Identifiers that are checked by the system are ID numbers, CODES, and DEFAULT EMAIL addresses.
- During your first import, an ID number will be automatically assigned to each imported contact. After that, you can use that same ID number for any updates.
- CODE can be assigned to contacts either manually or automatically.
- DEFAULT EMAIL address is the third and the most common identifier which is assigned to each contact manually.
After the import, you can see the ID number and code by clicking the View button in your contacts list.
Before the first import, we suggest you prepare a file with all the contact information. If you decide to prepare import files with codes and emails, make sure, each contact gets a unique and only one time used code. If you only decide to use emails, then all the codes and IDs will be given to contacts automatically.
Warning!
Every import of new contacts will override already existing contacts if one of the three unique identifiers will match the already existing one.
Example: If your contacts list already includes a contact with CODE number 101, and you prepare a new import file that also contains CODE number 101, then the latest import will override the already existing one. This way you can lose already existing contacts.
# OUR ADVICE
Our advice is to import contacts with Codes and emails and let the system give them automated ID numbers. Once the amount of contacts grows, you can always export them, arrange them by identifiers (either codes or IDs) and edit them or add new ones and then import them back.
# IMPORTING CONTACTS WITH MULTIPLE CONTACT DETAILS
When importing contacts with multiple contact information of the same type (Example: contact with more than one email address), you must first import those contacts with only one contact information of the same type. After contacts are imported, you can manually add the other information of the same type.
If you wish to import more contact info with the importer, then you must identify the contact by the code and add the new contact info in the .csv file. The system will add the contact info to the existing one.
# IMPORTING CONTACTS WITH ADDRESSES
When it comes to importing contacts with addresses, make sure you put each info in a separate column and ALWAYS add all the required info: FIRST NAME, LAST NAME, EMAIL, STREET, STREET/HOUSE NUMBER, POSTAL CODE, CITY/TOWN, AND COUNTRY. Without all this information the import will fail.
# IMPORTING SHOP USERS
When importing shop users you need to import them with an address. You have the option to set both the shipping and the billing address.
To create an import document (CSV) with ease, we have prepared a table of content you can import when adding contacts to DG1 marketing to facilitate the process of importing contacts.
| BASIC | |
|---|---|
| ID | The ID number is a unique number of the contact. At the first import, the ID must NOT be written, but it must be added to your .csv when UPDATING the import. |
| Code | The code will be generated automatically. |
| First name * | Mandatory field. Use any letters. Example: John |
| Middle name | Optional. Use any letters. Example: Paul |
| Last name | Use any letters. Example: Fitzgerald |
| Full name | Use any letters and put a space between the first, middle, and last name. Example: John Paul Fitzgerald |
| Username | This can be created automatically or you can write your own. Note that the username must be written as one word. |
| Gender | Write the gender with a word. Example: Male |
| Date of birth (YYYY-MM-DD) Date of birth (DD.MM.YYYY) Date of birth (MM/DD/YYYY) | Write the date in one of the following three date formats: Example: 1981-06-22 Example: 22.06.1981 Example: 06/22/1981 |
| CONTACTS | |
| Default E-mail * | Mandatory field. This email will be used as the customer’s default email address. Write emails only in the email format. Example: john@mydomian.com |
| Default Telephone | This number will be set as the customer’s default telephone number. Use numbers only. Example: 123456798 |
| Default Mobile | This number will be set as the customer’s default mobile number. Use numbers only. Example: 3562564 |
| Write emails only in the email format. Example: john@mydomian.com | |
| Country calling code | Do not use the + sign. Only use the number of the country’s calling code. Example: 44 |
| Telephone | Use numbers only. Example: 1 123456798 |
| Mobile | Use numbers only. Example: 41 3562564 |
| SHIPPING ADDRESSES (MAIN ADDRESS) | When you’re only adding customers, this address will be used as their main address. If you are importing shop users, this address will be used as their shipping address. Note! When adding the address of your contacts, you must add all the information marked with * but there are several options on how to add certain data. |
| First name (Shipping) | Use any letters. Example: John You can set a different first name for the shipping address. |
| Last name (Shipping) | Use any letters. Example: Paul You can set a different last name for the shipping address. |
| Telephone(Shipping) | Use numbers only. Example: 3562564 This telephone number will be used for the shipping address. |
| Country calling code (Shipping) | Do not use the + sign. Only use the number of the country’s calling code. Example: 44 This country calling code will be used for shipping address only. |
| Use either! Street with No. (Shipping) * OR Street (Shipping) * Street No. (Shipping) * | Use only one option. Add the street with number. Example: Kensington avenue 101 OR Use letters only. Example: Kensington avenue Use numbers or numbers and letters. Example: 303 |
| Unit No. (Shipping) | Write the number or the name of the apartment, suite, etc. |
| Use either! Town/City (Shipping) * Postal code (Shipping) * OR Town with postal code (Shipping) * OR Postal code with town (Shipping) * | Use only one option. Write the name of the town or the city in a separate column. Example: London Use capital letters and/or numbers only and write the postal code in a separate column. Example: W2 3XA OR Write both the name of the town and the postal code in one column. Example: London SW1A 2AA. OR Write the postal code followed by the name of the town or the city in one column. |
| Country (Shipping) * | You must write the name of the country according to the ISO standards. Click here to find the correct representation of the country. |
| Country State (Shipping) * | The state must be written according to ISO 3166-2 Code format or simply with a name. Example for the United States Example for Canada Example for Italy Example for Switzerland Example for Japan Example for Malaysia |
| BILLING ADDRESSES (MAIN ADDRESS) | This address will be used as the billing address when importing shop users. When you’re only importing marketing customers, this address should not be used. Note! When adding the address of your contacts, you must add all the information marked with * but there are several options on how to add certain data. |
| First name (Billing) | Use any letters. Example: John You can set a different first name for the billing address. |
| Last name (Billing) | Use any letters. Example: Paul You can set a different last name for the billing address. |
| Telephone(Billing) | Use numbers only. Example: 3562564 This telephone number will be used for the billing address. |
| Country calling code (Billing) | Do not use the + sign. Only use the number of the country’s calling code. Example: 44 This country calling code will be used for billing address only. |
| Use either! Street with No. (Billing) * OR Street (Billing) * Street No. (Billing) * | Use only one option. Add the street with number. Example: Kensington avenue 101 OR Use letters only. Example: Kensington avenue Use numbers or numbers and letters. Example: 303 |
| Unit No. (Billing) | Write the number or the name of the apartment, suite, etc. |
| Use either! Town/City (Billing) * Postal code (Billing) * OR Town with postal code (Billing) * OR Postal code with town (Billing) * | Use only one option. Write the name of the town or the city in a separate column. Example: London Use capital letters and/or numbers only and write the postal code in a separate column. Example: W2 3XA OR Write both the name of the town and the postal code in one column. Example: London SW1A 2AA. OR Write the postal code followed by the name of the town or the city in one column. |
| Country (Billing) * | You must write the name of the country according to the ISO standards. Click here to find the correct representation of the country. |
| Country State (Billing) * | The state must be written according to ISO 3166-2 Code format or simply with a name. Example for the United States Example for Canada Example for Italy Example for Switzerland Example for Japan Example for Malaysia |
| NOTIFICATIONS | |
| Global - All channels | 1 - checked (YES), 0 - unchecked (NO) |
| Global - Email | 1 - checked (YES), 0 - unchecked (NO) |
| Global - SMS | 1 - checked (YES), 0 - unchecked (NO) |
# Add new import
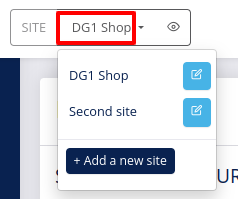
- To start a new import, navigate to the Site field in the header of your DG1 Admin section. Click the SITE dropdown menu and select the site to which you will import contacts.
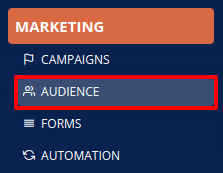
- Navigate to Audience in the Marketing section of your DG1 platform.
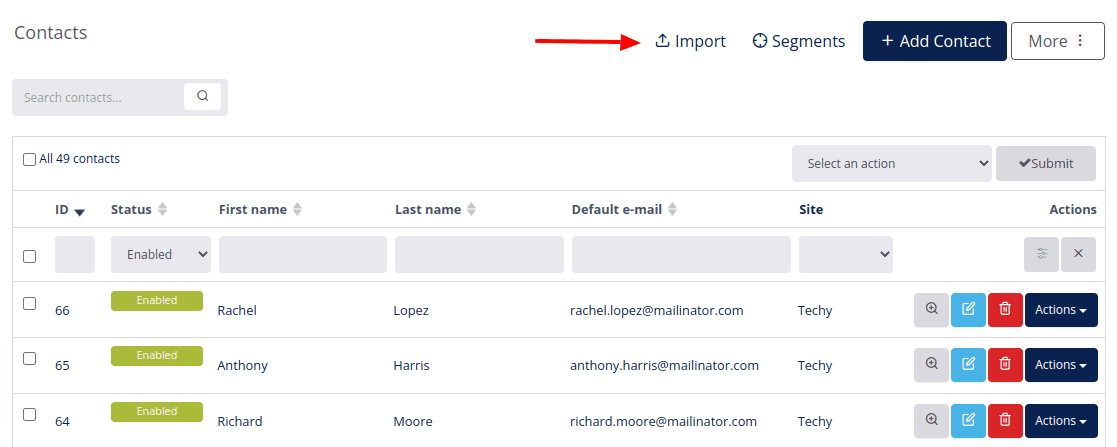
- Click Import.
- Enter details about the import:
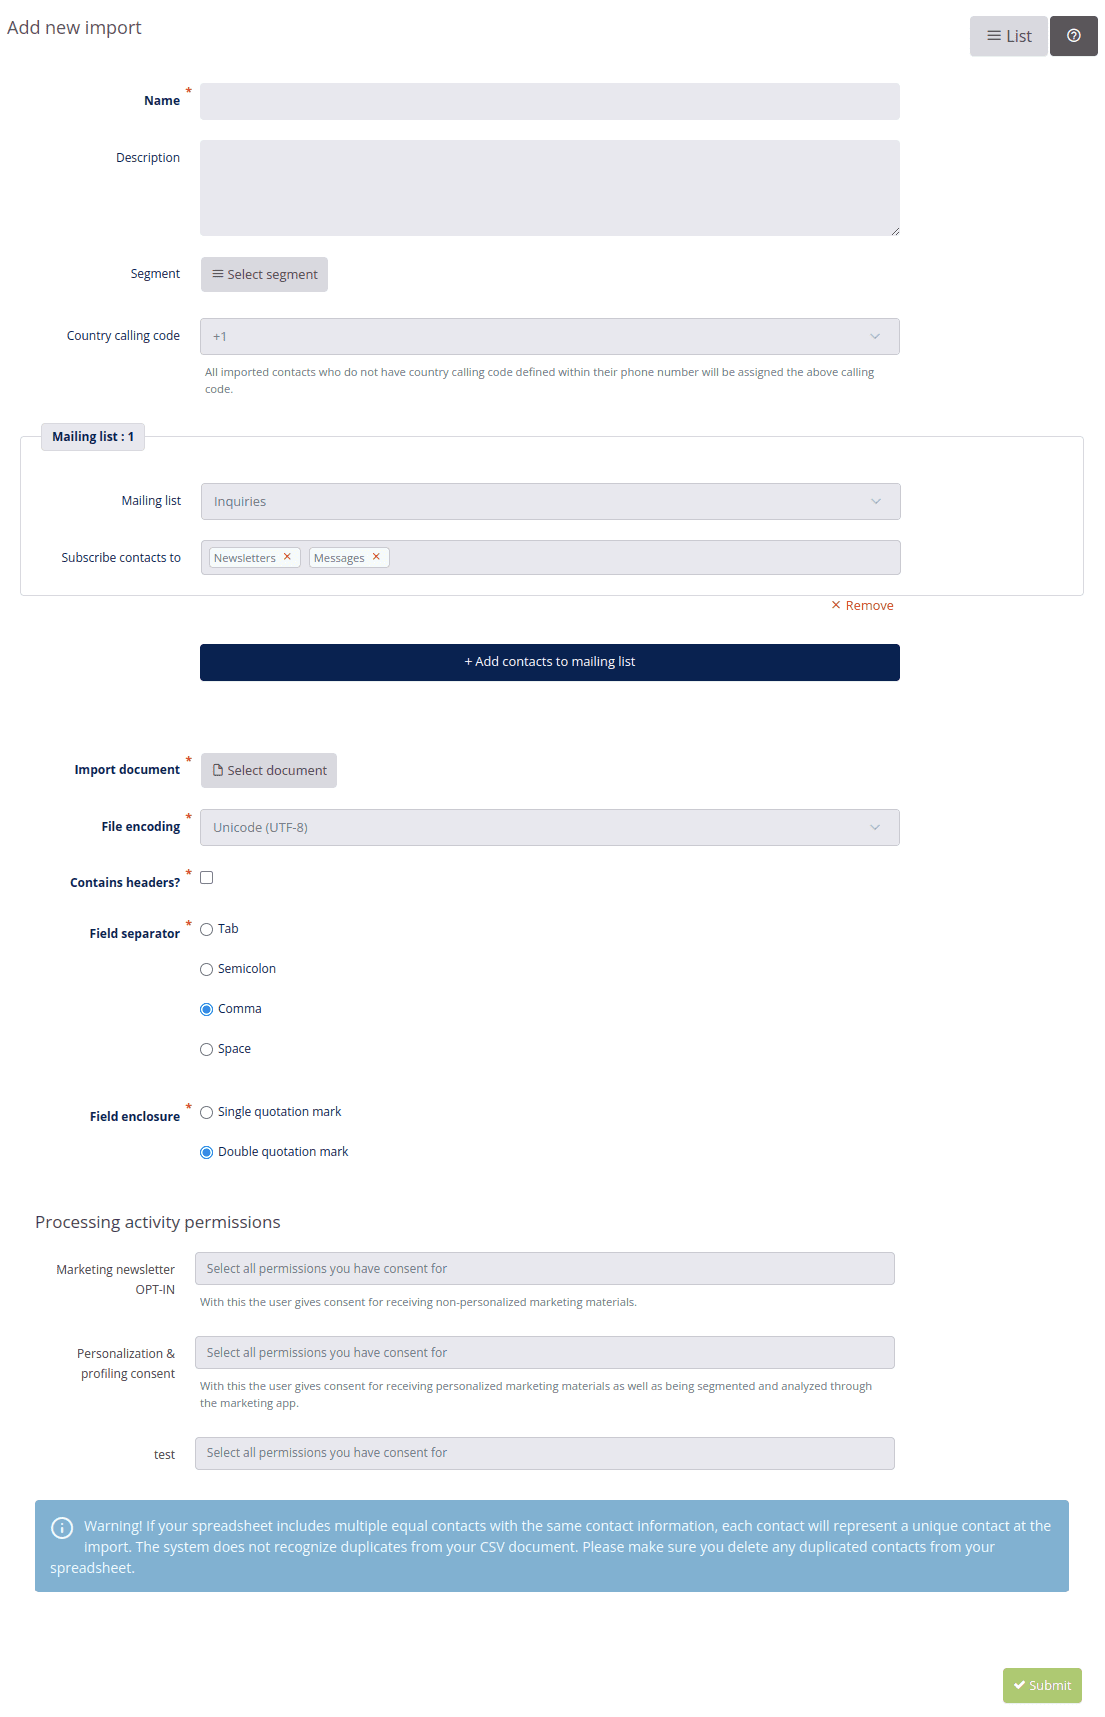
- Using site: This field indicates the site, which the customer will be imported for. Example: DG1 Shop
- Name: Name of your new import.
- Segment: Add contacts into a segment. Segment is a group of contacts that can be added with Import or by filters. You can import all contacts to one segment directly or you can filter them through a variety of characteristics. Example: Let’s say you had a prize game and you would now like to import contacts to your database. It’s recommended that you create a segment called Prize game rather than creating a new mailing list. Segmenting your contacts will really help you because you will be able to use the same contacts for different purposes and promotions. It’s better to have only a few mailing lists and more segments within mailing lists.
Note
Choosing a segment is not mandatory! You have to add contacts to Mailing lists, at least the default one!
For more information on how to create a new Segment see DG1 Targeting manual.
- Country code: Choose a country calling code if all your contacts in .csv file have the same country calling number. This way you do not have to manually add country calling codes to your .csv file. If you have international contacts list in the .csv file, it has to contain a column with all country calling codes.
- Subscribe contacts to refers to “one to one” communication with your contacts outside mailing lists. Recommendation: leave them as they are.
- Choose the mailing list to which you want to import contacts. Click in the window and choose your mailing list or leave it set to Default.

If you would like to delete specific notifications for your imported contacts, select mailing lists and delete notifications by clicking x’s. Example: click the  to delete a notification.
- Import document: Upload file through file selector.
- File encoding: You have to select the same file encoding as in the import file (Example: UNICODE UTF 8).
- Contains Headers: Check, if your import file contains the headers row. (Example: Name, Last name, Address etc.).
- Create shop user as well?: Check this field if you want to create a shop user from the imported customer. The user will be imported to the site you are currently on, which is indicated at the top of the import page. (Example: Using site: DG1 Shop)
- Field separator: Choose the same as when you were saving your import file as .csv (Example: comma).
- Field enclosure: Choose the same as when you were saving your import file as .csv (Example: double quotation mark).
- Processing activity permissions - due to GDPR legislation you must select all the types of information for which you claim you have acquired a proper consent in the document you are about to import. Depending on the type of data, please select options under Marketing newsletter OPT-IN and/or options under Personalization & profiling consent.
- To create your own consent please go to Advanced -> Processing activities and click Add
 .
.
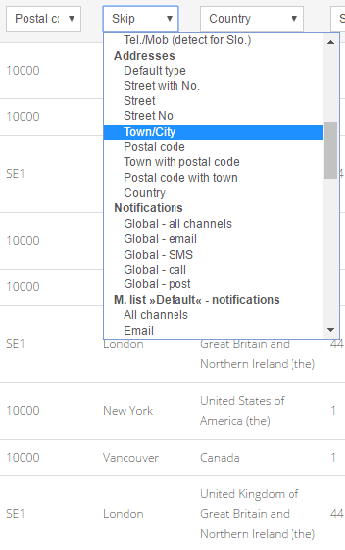
In your Import preview select headers, if they have not been recognized from .csv file. Above each column click Skip  and select the attribute to which the information in column refers to.
If you already had headers in your import file, the selection will be done automatically but it might not recognize all headers. So follow the above instructions. If your import document does not include headers, you will have to add them manually.
Example: Import did not recognize certain headers and you will have to manually add them by clicking the arrow and choosing the right one.
- To save click Submit
 .
. - Click Actions and choose Import.
- Refresh page and the contacts will be imported.
Note
When importing contacts you should select a header (or the system will automatically detect it). If the header is an attribute and your .csv file has no value for this attribute, the default value of this attribute will be added automatically after import. To avoid this situation make sure you do NOT import a csv. file with empty attribute columns.
To view results of your import click Actions and select Results.
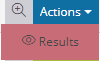
To view the status of your imports click List and choose the import you would like to check. Click Actions and after that Results. See the succeeded and failed contacts. By clicking Show reason you will see a reason explaining why the import of that contact has failed.
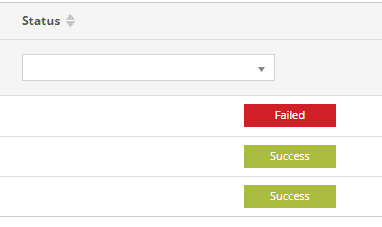
Export the failed contacts by clicking Export failed ![]() . Then select your preferred export type (either excel, CSV, ods, etc.) Once the file is downloaded to your computer, you can open it, correct the wrong data, save the file and import it back to your platform following the same process as with your other imports.
. Then select your preferred export type (either excel, CSV, ods, etc.) Once the file is downloaded to your computer, you can open it, correct the wrong data, save the file and import it back to your platform following the same process as with your other imports.
# How to save .CSV file
In your spreadsheet go to:
- Save as.
- Select file type: .csv.
- File name.
- Keep the current format.
- Character set = UNICODE UTF-8.
- Field delimiter is a comma (you can choose another).
- Text delimiter (example: “quote mark”) will be added automatically - quote all text cells (check).
- OK.