# Importing products
DG1 platform allows you to import multiple products into your system. For the import to run smoothly, be sure to create or set up the following sections in DG1 platform before you import your products:
- Product group and their IDs OR Custom product group IDs
- Brands and their IDs or custom IDs
- Categories and their IDs or custom IDs
- Tax rates
- Attributes – descriptions, specifications, sizes, colors etc.
# On this page
# Simple import
The most important information when importing products to your DG1 platform are the following:
- Product group ID (Key or Custom product group ID)
- Name
- Regular price
You can find an example of a simple .csv spreadsheet here (opens new window).
# Advanced import
After you’ve set up all the necessary elements in the DG1 platform (product groups, categories, brands, taxes, shipping methods, payment methods, etc.), you need to prepare a .csv file. The first line of your .csv spreadsheet must include the field headers described in the table where field header names can be the same or similar. In a later step you will connect each column to correct headers.
The subsequent lines in the file should contain data about your product. To prepare a .csv file you can use Excel or any other spreadsheet format.
Each type of information about your products must be in a separate column.
# Importing products with images
To import products with images, you first have to upload images to the File system. You should know which image will be displayed in which location. Example: image 0022.jpg will be displayed as the product's main image. To help you remember where each image will be displayed, you should prepare a list of image names and their locations, for your reference only.
Each image name has to be put in a separate column and after importing .csv you will have to choose between the following headers for each image: Main image, Cover image, Gallery image, and Bottom gallery image.
Examples of .csv spreadsheets available for download:
Below is an overview of all headers (columns), which you can select in your imported file with a short description of how/what to write in the .csv spreadsheet.
| GENERAL | |
|---|---|
| ID | The ID number is a unique number of the product. At the first import, the ID must NOT be inserted, but must be added to your .csv when UPDATING the import. When updating import, you must use the same ID number to update the product successfully. Make sure you don’t use a different ID number so the product is not overwritten with another one. |
| SKU | SKU is the product’s stock keeping unit of the product and usually connected to other tracking inventory services. Unique for each product. |
| Custom product ID | Use any letters, numbers, or text symbols. Unique for each product. |
| Product group ID | Mandatory info. The Product group ID is created when you add a new product group and you can find it in the ID column of your Product groups page (SHOP -> Catalog -> Products -> Product groups). |
| Product group key | Optional. Use either product group ID or key. You can find the Key by navigating to SHOP -> Catalog -> Products -> Product groups and clicking View  of the selected group. of the selected group. |
| Name | One of the most important information required in each import. A name can contain letters, numbers, text symbols, and spaces. |
| URL | The URL is generated automatically. If you wish to customize it, be sure to enter it in the correct URL format (example: /product-alias-url). |
| Short description | Plain text without formatting, which should not exceed 220 characters. |
| Brand ID | The ID number of your brand, which you can find listed in the ID column on the Brands page in your DG1 admin panel (SHOP -> Catalog -> Brands). |
| Write the number of pieces, kilograms, meters, cubic meters or liters with a number. For decimals use the same separators as the ones you’ve set in your Edit site page (General settings -> Formatting -> Decimal separator). |
| Net quantity | Enter the net quantity of the product which will be used to calculate the price per unit. Use the same separators as the ones you’ve set in your Edit site page (General settings -> Formatting -> Decimal separator). |
| External URL | When you wish to redirect a user to another site. Write it in the URL style. |
| Measurement unit | Enter the same measurement units as the ones you use in your Site settings. Click here here to find the correct representation of the units. |
| Add to cart unit | Enter the same measurement units as the ones you use in your Site settings. Click here here to find the correct representation of the units. |
| SITE SPECIFIC SETTINGS | |
| Regular price | The price of the product. Don’t include any currency symbols. Use the same separators as the ones you’ve set in your Edit site page (General settings -> Formatting -> Decimal separator). |
| Can be bough | 1 - checked (YES), 0 - unchecked (NO) |
| Display on content pages | 1 - checked (YES), 0 - unchecked (NO) |
| Display in product grid | 1 - checked (YES), 0 - unchecked (NO) |
| Is activated | 1 - checked (YES), 0 - unchecked (NO) |
| Deactivated from | Write in format (YYYY-MM-DD HH:MM:SS) |
| Deactivated to | Write in format (YYYY-MM-DD HH:MM:SS) |
| Stock | The number of items you have in stock for this product. |
| TAX RATES | |
| Tax rate name 1 | The title of the Tax rate. |
| Tax rate value 1 | The tax rate value (example: 22) |
| Tax rate name 2 | The title of the Tax rate. |
| Tax rate value 2 | The tax rate value (example: 22) |
| SEARCH ENGINE OPTIMIZATIONS | |
| Searchable | 1 - checked (YES), 0 - unchecked (NO) |
| SEO descriptions | Plain text without styling. |
| SEO keywords | Individual keywords must be separated with a comma. |
| Include search words | Individual search words must be separated with a comma. |
| Exclude search words | The excluded search words must be separated with a comma. |
| GTIN/EAN/BARCODE | |
| Gtin 1 | The barcode or EAN of the product. |
| Gtin 2 | The barcode or EAN of the product. |
| CATEGORY | |
| Category ID 1 | The unique number assigned to each category by the system. You can find it on the Edit category page, which you can access by selecting the respective category on the tree (SHOP -> Catalog -> Categories). |
| Custom category ID 1 | A custom identifier assigned by you, which you can find on the Edit category page by selecting the respective category on the tree (SHOP -> Catalog -> Categories). |
| Category name 1 | The name of the category. Write it in the same way as the category name. Note! For multiple categories, separate the ID value of each category or subcategory in a separate column. You can also assign the product to only one specific subcategory. |
| SHIPPING | |
| Is tangible | 1 - checked (YES), 0 - unchecked (NO) |
| Weight | Package weight. Use the same separators as the ones you’ve set in your Edit site page (General settings -> Formatting -> Decimal separator). |
| Volume | Volume of the package. Use the same separators as the ones you’ve set in your Edit site page (General settings -> Formatting -> Decimal separator). |
| Width | Package width. Use the same separators as the ones you’ve set in your Edit site page (General settings -> Formatting -> Decimal separator). |
| Height | Package height. Use the same separators as the ones you’ve set in your Edit site page (General settings -> Formatting -> Decimal separator). |
| Length | Package length. Use the same separators as the ones you’ve set in your Edit site page (General settings -> Formatting -> Decimal separator). |
| Tobacco product | 1 - checked (YES), 0 - unchecked (NO) |
| Alcoholic product | 1 - checked (YES), 0 - unchecked (NO) |
| Additional shipping requirements - fragile | 1 - checked (YES), 0 - unchecked (NO) |
| Additional shipping requirements - refrigerated | 1 - checked (YES), 0 - unchecked (NO) |
| VARIATIONS | |
| Is main variation | 1 - checked (YES), 0 - unchecked (NO) |
| At the first import create your own Main variation custom product ID. At the update use any of the three. The main variation product ID can be found in SHOP -> Catalog -> Products. |
| ATTRIBUTE TYPES | Types of mapping in the .csv file |
| Checkbox | (Mandatory information in Catalog -> Products -> Edit/Add product -> General settings and Site-specific settings tabs and checkbox attributes): YES: 1 - checked, NO: 0 - unchecked |
| Select | Enter the title of the option (example: Color: red) |
| Select with image | Enter the title of the option (example: Color: red) |
| Multi select | Enter each value in a separate column and be sure to select the same location (attribute) of the value in the preview of the file (Example: Suitable for: outdoor and indoor). |
| Attribute Text | Insert the entire text in one column. |
| Date time format | Use the same format as the one you’ve set in the Date formatting section of your Edit site settings page. You can choose to enter only the date (20.05.2020) or date and time (20.05.2020 14:30:15). |
| IMAGES | |
| Enter the location and name of the image together with the file format (example: products/image.png or /products/image.png) |
Note: If you realize that the first import contained incorrect information, you can delete all products and start from the beginning or only import products with the correct information.
The products will be imported to the selected site.
# Saving .csv file
Once you have prepared a spreadsheet, you need to save it to your desktop as a csv. file.
In your spreadsheet go to:
- Save as
- Select type: csv. or csv (comma delimiter)
- File name
- Keep current format
- Character set = UNICODE UTF-8
- Field delimiter is comma (or other)
- Text delimiter (example: “quote mark”) will be added automatically - quote all text cells (check).
- OK.
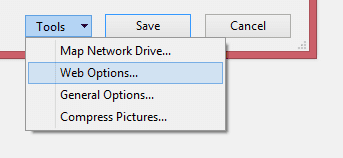
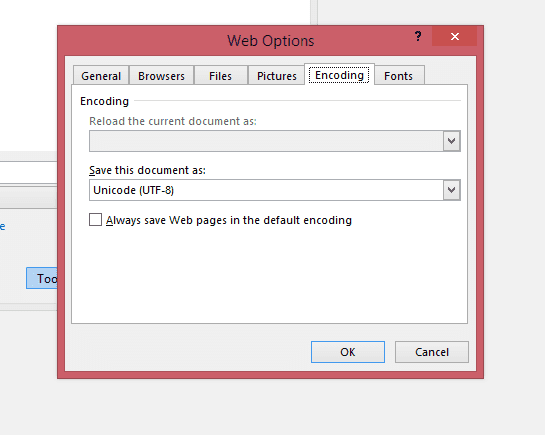
WINDOWS USERS: If you are working with the latest Excel, when clicking Save as, you will have to go to Tools, select Web options and choose Encoding (UNICODE UTF-8). Excel will choose a field enclosure and text delimiter based on the locale settings of your operating system. Different locales can have different settings.
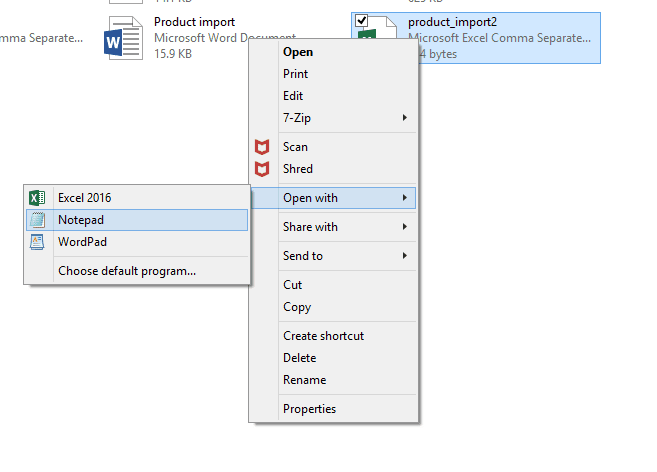
To test what type of quotation marks your file will use, you can always just open your excel spreadsheet in Notepad and see what quotation was used by right clicking on the .csv document, selecting the Open with option and clicking Notepad.
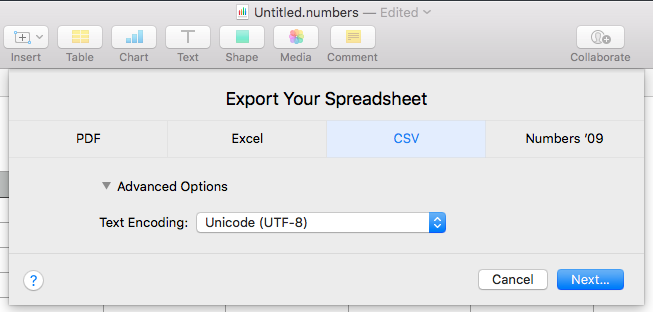
MAC USERS: If you are using Numbers application, you can export to .csv file by clicking File -> Export to -> CSV. In the new window expand Advanced Options and select Unicode (UTF-8) text encoding. The file will usually be exported with semicolons used as separators. To check what type of quotation mark and separator is set, you can open the csv file in the TextEdit application. You do that by right clicking on the csv document, selecting the Open With and clicking TextEdit.app.
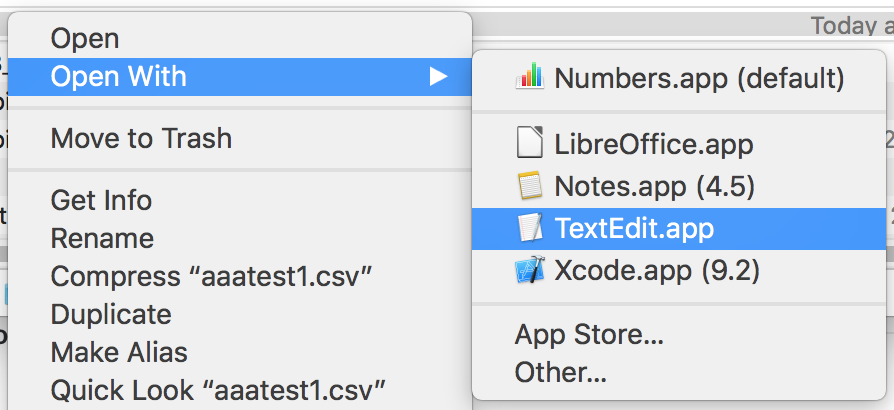
If you have any other spreadsheet applications, please go online and find a tutorial or manuals on how to save a .csv file for the respective application.
# Start product import with .csv file
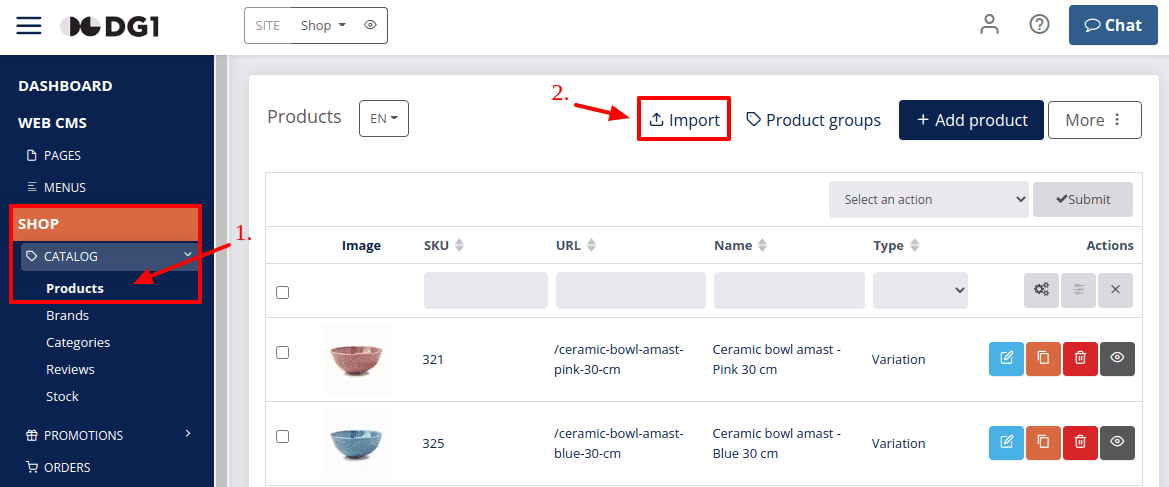
- Navigate to SHOP -> Catalog -> Products and click Import
 in the page header.
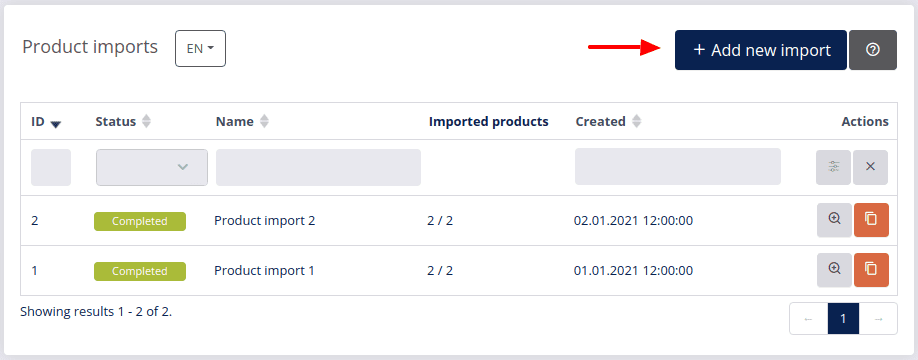
- To add a new product import, click Add new import
 .
.
- Enter details about new product import:
- Name your Import.
- Add a short description for your reference.
- Select the Import document (your previously saved csv. file).
- Select File Encoding. You can select one of the following: Unicode (UTF-8), Eastern Europe (Windows-1250 / WinLatin-2), Japanese (Shift_JIS) or Japanese (ISO-2022-JP)
- Check the Contains headers checkbox if your spreadsheet has headers.
- Choose the same delimiters (Field separator and Field enclosure) as when you were saving the file.
- Once you import the document and see the preview, thoroughly review the columns and determine the right location for each one. By clicking Skip all the available options will appear, you just need to make sure to locate the correct one.

To save the document, click Submit
 . You will be redirected to your Imports page, where the document you’ve just saved should appear with the Prepared status.
Once you are ready to import, click Actions and Import.

The system will start the import procedure, which may take some time.

To check the progress or see whether the import has finished, refresh your page. Once the import processing has been completed, the import document status will change to Completed  .
.
After that be sure to click View  in the import row to see if all products have been successfully imported. If the status is Failed
  , click Show reason
  to see what went wrong.
Make the necessary corrections in the .csv file and import the products again by repeating the above steps.
If the import was successful, then the status of each product will be changed to Success.

IMPORTANT
The recommended maximum amount for importing products in one session is 1000 products. If possible, split the import document in smaller batches with less products. The estimated time for importing 1000 products is one hour.
When importing for the first time, we highly recommend to import only up to 20 products so you don’t have to wait and instantly see what additional info you need or would like to prepare.